First project is for a Nature Book.
Supplies needed:
- cover stock paper for front and back
- 3 to 5 sheets of typing paper for inside pages
- one rubberband
- one small stick (the height or a little longer of your cover
1) Cut the cover and inside sheets so they are all the same size.
2) Put the covers on the outside and pages on the inside just like you want your book to be and cut two holes in one end with the hole punch.
3) From back to front thread one end of the rubberband into one of the holes. Then loop the end of the rubberband around the stick. From back to front loop the other end of the rubberband in the other hole and stretch in up and over the other end of the stick securing it.
4) Decorate the cover.
Monday, August 10, 2009
Saturday, December 13, 2008
December in the Library
Sorry my postings have been so sparse. Our home computer has been crashing and we've been dealing with technicians for the past 6 months. So this will be short and without photos until our new computer is dispatched.
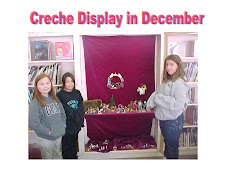
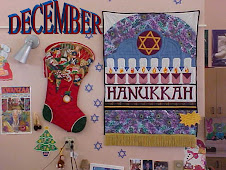
Decorations/books are up this month for Hanukkah, Christmas, and Kwanzaa. A friend has loaned me her Creche collection for the display case.
I have a simple holiday bookmark making activity at recess along with the Dreidal game but students seem to be most interested in reshelving books for prizes! I'll describe the holiday card bookmark and hopefully be able to post photos at some point.
Materials needed:
Discarded holiday cards from past years.
a two hole punch (easier for kids to use than a one hole punch)
colorful yarn (about 2 one foot lengths for each bookmark)
Take the front (picture) part of the card and cut off the inside at the fold line. Discard the inside message part. Fold the picture front card lengthwise in thirds. I usually make the first fold especially for the younger students.
Show kids how to slide the folded card under one of the hole punchers and press down to punch a hole in top and bottom of the folded card. If they don't make a good hole it's easy to simple cut the top off and let them do it over.
Finally you're going to attach yarn in the holes. I have the students fold one piece of yarn in half. Put the folded yarn end in one of the holes pulling it through just enough so that a loop is formed large enough to pull the two yarn tails back through this loop and pull them tight so that they form a sort of knot over the edge of the card. Repeat in the other hole and it's done! These make nice gifts for the holidays.
Wednesday, November 5, 2008
November in the Library and Library Helpers
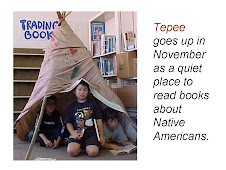
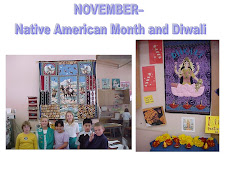
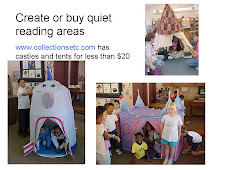
Decorations and books are up this month for Election Day, Veterans Day, and Thanksgiving. In honor of Native American Month I’ve erected a simple tipi as a quiet place for students to read books about Native Americans.
I promised to describe in detail the most popular recess activity in the library (and the most educational). All students (1st through 5th) are welcome to help reshelf books in order to earn points for prizes. It took me years to figure out an easy way to do this. The first time I tried an elaborate training program with older students who had to pass a test of the dewey decimal system before they could start. It took too much time, was too difficult for more than a select few students to try, and when I saw a 5th grader filling empty shelves with books--I gave up!
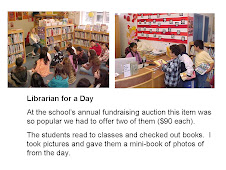
HOW IT WORKS FOR PRIMARY STUDENTS: There is no training process. Students write their names on an index card, grab a book from the rolling cart (where I have one side for E books only) and either have a friend help them shelf it or I take a minute to help them with their first book. 1st through 3rd may only shelf E books. Our spine labels include the first three letters of the author’s last name and the shelves have the beginning letter posted on them. I try to hand a first timer a book that I know will have other books with the exact same spine label. (I don’t expect students to put the books in order beyond those first three letters so books by Martin, Marshall, and Marsh will all be lumped together but it’s not that difficult for a teacher to locate a needed book within that range). Once the student finds the proper location for the book, they shelf it, and slide the index card with their name next to the book. Then they stand there and call me to come check the book. If it’s correct I write a star on their card and they go get another book. If it’s not I give them hints on where to go.
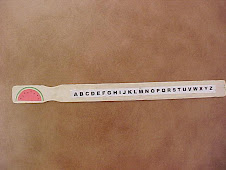
The most difficult books for a newbie 1st grader are the ones that are the only spine label on the shelf. Certain students take delight in these challenges so the book can be handed off to them. Or I give the student a shelf marker with the alphabet labeled on it (wooden paint sticks I’ve decoupaged) and show them how to go about locating where it would go. They get 2 stars for putting away a difficult book.
Prizes, of course, are the incentive. I have a storage shelf with boxes full of prizes. I’m a quilter and have endless scraps of fabric so for one star you may choose a piece of fabric or a bookmark. There is a 3* box, a 5* box, 10* box, 15* box, and 20* box. When the student buys a prize the stars are crossed off. When a card is filled (and crossed off) on both sides the student gets to choose a prize from the special Fill a Card box.
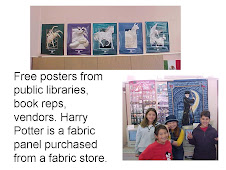
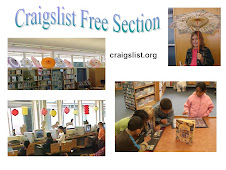
LOCATING PRIZES: The prizes mostly come from parents. I’ve posted a notice in the monthly school newsletter or tapped parents of middle schoolers and have bountiful supplies of trinkets. I also put in weird stuff I collect—book posters, bones, colored rocks, knick knacks, little boxes, stickers, free books—stuff kids like! You can approach people holding garage sales and see if you can pick up all the things that don’t sell at the end of the day. Sometimes retiring teachers have things that can be used. I also search Craigslist freebies and have found some great giveaways there.
HOW IT WORKS FOR UPPER GRADES: 4th and 5th graders (and 3rd graders when all the E books are gone) may only put away non-fiction and chapter fiction books which are located in the same area of the library. They need a little more guidance but quickly figure out how to find the correct dewey number and the correct 3 letters of the author’s last name. They get 2 stars for every non-fiction book they shelf and 1 star for chapter books. The books for them to shelf are put on the reverse side of the rolling cart from the E books but once all the books are shelved on that side they may put away E books.
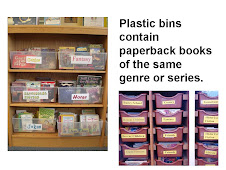
I also have a lot of paperback books that are put into labeled bins. These are sometimes easier to start a newby off. Because it's so easy to put these books away I give a tally mark instead of a star for them. Three tallies then become a star.
Our recesses separate primary from upper grades which makes it easier for one person (me or sometimes an adult at lunch recess) to check the books because I only have to stand in one area of the library instead of racing back and forth from E section to Fiction or Non-fiction. Sometimes there are 20 little voices calling me to come check their books so it can get hectic! It’s a great way to help students learn how to find books and I love it when a student stops re-shelving because he/she has found a book they really want to stop and read.
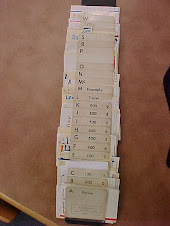
When a student is finished shelving for the day they slide their card in a file box behind the letter of their first name or I use an old alphabetical card sorting thingey from before the library catalog was computerized. I’ve tried to explain this as best I could but if you have questions feel free to email me. At the end of the year I usually have at least 150 cards which means half our student population has at least tried to shelf books. Some kids come every day, one student has already filled both sides of two index cards this school year (since September!). He’s very dedicated and unfortunately has an annoyingly loud voice when he calls, “Mrs. Cutter, I found a book!” I had to initiate a new rule—if you call me more than two times I take away a star from your card!
I promised to describe in detail the most popular recess activity in the library (and the most educational). All students (1st through 5th) are welcome to help reshelf books in order to earn points for prizes. It took me years to figure out an easy way to do this. The first time I tried an elaborate training program with older students who had to pass a test of the dewey decimal system before they could start. It took too much time, was too difficult for more than a select few students to try, and when I saw a 5th grader filling empty shelves with books--I gave up!
HOW IT WORKS FOR PRIMARY STUDENTS: There is no training process. Students write their names on an index card, grab a book from the rolling cart (where I have one side for E books only) and either have a friend help them shelf it or I take a minute to help them with their first book. 1st through 3rd may only shelf E books. Our spine labels include the first three letters of the author’s last name and the shelves have the beginning letter posted on them. I try to hand a first timer a book that I know will have other books with the exact same spine label. (I don’t expect students to put the books in order beyond those first three letters so books by Martin, Marshall, and Marsh will all be lumped together but it’s not that difficult for a teacher to locate a needed book within that range). Once the student finds the proper location for the book, they shelf it, and slide the index card with their name next to the book. Then they stand there and call me to come check the book. If it’s correct I write a star on their card and they go get another book. If it’s not I give them hints on where to go.
The most difficult books for a newbie 1st grader are the ones that are the only spine label on the shelf. Certain students take delight in these challenges so the book can be handed off to them. Or I give the student a shelf marker with the alphabet labeled on it (wooden paint sticks I’ve decoupaged) and show them how to go about locating where it would go. They get 2 stars for putting away a difficult book.
Prizes, of course, are the incentive. I have a storage shelf with boxes full of prizes. I’m a quilter and have endless scraps of fabric so for one star you may choose a piece of fabric or a bookmark. There is a 3* box, a 5* box, 10* box, 15* box, and 20* box. When the student buys a prize the stars are crossed off. When a card is filled (and crossed off) on both sides the student gets to choose a prize from the special Fill a Card box.
LOCATING PRIZES: The prizes mostly come from parents. I’ve posted a notice in the monthly school newsletter or tapped parents of middle schoolers and have bountiful supplies of trinkets. I also put in weird stuff I collect—book posters, bones, colored rocks, knick knacks, little boxes, stickers, free books—stuff kids like! You can approach people holding garage sales and see if you can pick up all the things that don’t sell at the end of the day. Sometimes retiring teachers have things that can be used. I also search Craigslist freebies and have found some great giveaways there.
HOW IT WORKS FOR UPPER GRADES: 4th and 5th graders (and 3rd graders when all the E books are gone) may only put away non-fiction and chapter fiction books which are located in the same area of the library. They need a little more guidance but quickly figure out how to find the correct dewey number and the correct 3 letters of the author’s last name. They get 2 stars for every non-fiction book they shelf and 1 star for chapter books. The books for them to shelf are put on the reverse side of the rolling cart from the E books but once all the books are shelved on that side they may put away E books.
I also have a lot of paperback books that are put into labeled bins. These are sometimes easier to start a newby off. Because it's so easy to put these books away I give a tally mark instead of a star for them. Three tallies then become a star.
Our recesses separate primary from upper grades which makes it easier for one person (me or sometimes an adult at lunch recess) to check the books because I only have to stand in one area of the library instead of racing back and forth from E section to Fiction or Non-fiction. Sometimes there are 20 little voices calling me to come check their books so it can get hectic! It’s a great way to help students learn how to find books and I love it when a student stops re-shelving because he/she has found a book they really want to stop and read.
When a student is finished shelving for the day they slide their card in a file box behind the letter of their first name or I use an old alphabetical card sorting thingey from before the library catalog was computerized. I’ve tried to explain this as best I could but if you have questions feel free to email me. At the end of the year I usually have at least 150 cards which means half our student population has at least tried to shelf books. Some kids come every day, one student has already filled both sides of two index cards this school year (since September!). He’s very dedicated and unfortunately has an annoyingly loud voice when he calls, “Mrs. Cutter, I found a book!” I had to initiate a new rule—if you call me more than two times I take away a star from your card!
Tuesday, October 7, 2008
October Decoratons and Activities
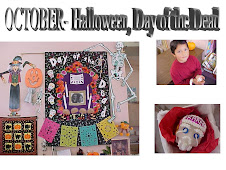
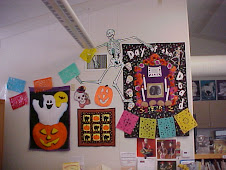
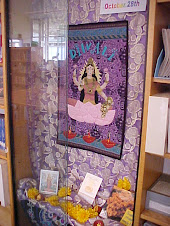
Ack, the days are going by too fast! Decorations/books are up this month for Yom Kippur, Columbus Day, Diwali, Halloween, and Days of the Dead.
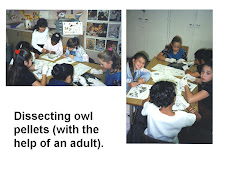
The last two Fridays I’ve been lucky enough to have a parent helper at lunch recess. He’s been supervising the dissection of owl pellets with the very eager students. Here in the San Francisco Bay Area barn owls roost in the tops of the date palm trees which are like fast food stations for them. Rats and birds feast on the dates and owls feast on the rats and birds. Students can identify the eaten animals by dissecting the pellets (which are the undigested parts that the owls regurgitated). You may order owl pellets online if you can’t find your own. If you do collect them yourself be sure to wrap the pellets in aluminum foil and heat-sterilize them at 300 degrees for 30 minutes.
Students wear latex gloves and use tweezers and bamboo skewer sticks to pick through the fur and hair in order to find the skeletons. I found identification charts online or the DK Eyewitness book Bird has excellent pictures and information about what they might find. The students were so enthusiastic and have been asking every day to repeat the activity but it really requires adult supervision.
Monday, September 22, 2008
Book for this week
Since today is the first day of Fall I thought I'd read one of my favorite books--Fall is Not Easy by Marty Kelley to the younger students (K and 2nd). 3rd to 5th are getting a quick lesson on how to use the computer browsers with the computer projector system.
The most popular recess activity is reshelving books! 1st through 5th grade students are welcome to put books away for points which they can use to buy prizes. I'll explain more about this system in another post.
Happy Fall!
The most popular recess activity is reshelving books! 1st through 5th grade students are welcome to put books away for points which they can use to buy prizes. I'll explain more about this system in another post.
Happy Fall!
Tuesday, September 9, 2008
This Week I'm Reading
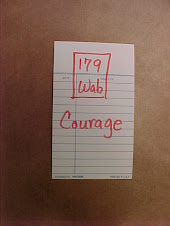
This week I'm reading Courage by Bernard Waber in honor of 9/11. I figure in an elementary school the students now are clueless about that day so I don't bring it up but still I like to do something. I'm reading it to 2nd grade and up. I ask for their ideas of courage or courageous people (I've gotten some interesting answers!).
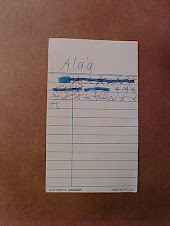
I'm doing a little book finding lesson before reading to 3rd grade up. On an index card I've got the call number and title of the selection for that day (see picture). I send two students to look for the book and bring it back. (This means I have to remember to reshelf the book right before a class comes in!) I tick off the students names from a class list and will make sure that everyone has a chance to find a book in the year.
I'm doing a little book finding lesson before reading to 3rd grade up. On an index card I've got the call number and title of the selection for that day (see picture). I send two students to look for the book and bring it back. (This means I have to remember to reshelf the book right before a class comes in!) I tick off the students names from a class list and will make sure that everyone has a chance to find a book in the year.
Friday, August 29, 2008
Library Summer Camp Was Great!
Thank you Peter and all the staff and presenters who made the recent Library Summer Camp a rewarding experience both as a presenter and attendee. I really learned a lot and I appreciate all the wonderful compliments I've received on my presentation.
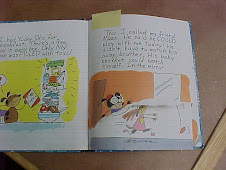
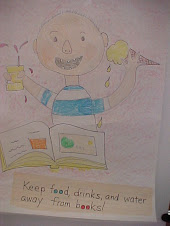
I thought I'd post the David Goes to the Library book that I'll be starting the year with next week. It's a fun way to introduce the rules of behavior in the library as well as book care. The first year I did this I read No, David! by David Shannon to each class (yes, even fifth graders still love it). Then I told each class that I had an idea for a book called, David Goes to the Library. I asked for their suggestions on the kinds of things we could have David doing wrong in the library and not taking care of books. I'd write these ideas down on a chart pad.
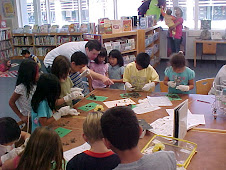
The next week when they came I had taken the ideas (or the ones I wanted to use) and drawn pictures (or have an artist friend) of David doing what he shouldn't do in the library. I drew these big book size on chart pad paper (be sure to trim it so it'll fit in your laminator) and I used all the David books to see if I could use similar pictures for my needs. I had invited students to help color the pictures at recess during the week and then laminated them. Be careful to use good quality crayons for coloring because some of them melted in the laminator's heat and it looks like David's face is dripping!
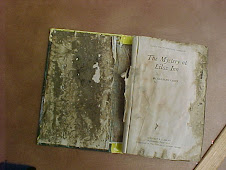
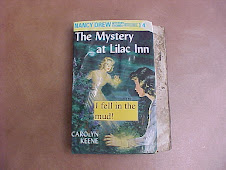
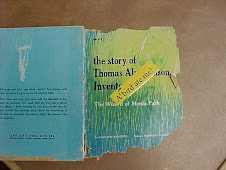
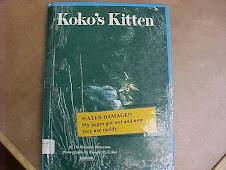
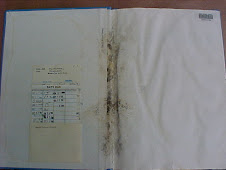
When I read this book each year now (after first reading No, David!) I try to cover up the words and have the classes guess from the picture what David is doing wrong. When I come to the book care pages I bring out an actual library book that has been damaged in the way that is mentioned on the page (scribbled on, torn, moldy from food or water damage). I try to save the most horrible examples to share for a lasting impression. I guess it worked because one little boy brought his mom in after school asking to see the "dirty book in the library". He meant the one I'd shared that had been dropped in the mud I quickly explained to the mom!
I thought I'd post the David Goes to the Library book that I'll be starting the year with next week. It's a fun way to introduce the rules of behavior in the library as well as book care. The first year I did this I read No, David! by David Shannon to each class (yes, even fifth graders still love it). Then I told each class that I had an idea for a book called, David Goes to the Library. I asked for their suggestions on the kinds of things we could have David doing wrong in the library and not taking care of books. I'd write these ideas down on a chart pad.
The next week when they came I had taken the ideas (or the ones I wanted to use) and drawn pictures (or have an artist friend) of David doing what he shouldn't do in the library. I drew these big book size on chart pad paper (be sure to trim it so it'll fit in your laminator) and I used all the David books to see if I could use similar pictures for my needs. I had invited students to help color the pictures at recess during the week and then laminated them. Be careful to use good quality crayons for coloring because some of them melted in the laminator's heat and it looks like David's face is dripping!
When I read this book each year now (after first reading No, David!) I try to cover up the words and have the classes guess from the picture what David is doing wrong. When I come to the book care pages I bring out an actual library book that has been damaged in the way that is mentioned on the page (scribbled on, torn, moldy from food or water damage). I try to save the most horrible examples to share for a lasting impression. I guess it worked because one little boy brought his mom in after school asking to see the "dirty book in the library". He meant the one I'd shared that had been dropped in the mud I quickly explained to the mom!
Subscribe to:
Posts (Atom)
.jpg)
.jpg)